Implementing Password Generator Step-by-Step
Step-by-Step Implementation of Our Project
Now we’ll go through the implementation of the Random Password Generator step by step. We’ll start from setting up the React environment, then writing the code for the application, and finally running it locally.
Set up the Environment
1. Install Node.js: If not already installed, download Node.js from the official website and run the installer. This will also install npm. Once done, verify the installation:
node -v
npm -v
You should see version numbers output in your terminal.
2. Create a React App: We’ll use Create React App to quickly scaffold a React project. Open a terminal/command prompt, navigate to the directory where you want your project, and run:
npx create-react-app random-password-generator
This uses npx to execute the latest CRA tool without installing it globally. The above command will create a folder named random-password-generator (or whatever name you choose) with the initial project structure and files.
3. Navigate & Start: Move into the project directory and start the development server:
cd random-password-generator
npm start
This will launch the app in development mode. By default, it opens http://localhost:3000 in your browser. At this point, you should see the default React welcome page. This means the setup was successful.
Create Application Structure (Directory Structure)
After running the above steps, you have a React project structure generated by Create React App. It will look like this:
random-password-generator/
├── node_modules/ (project dependencies)
├── public/
│ ├── index.html (HTML template)
│ └── ... (favicon, manifest, etc.)
├── src/
│ ├── App.js (main App component)
│ ├── App.css (styles for App component)
│ ├── index.js (entry point, renders App)
│ └── ... (other files like logo, test files, etc.)
├── package.json (project configuration and dependencies)
└── README.md (instructions by Create React App)
We will be mostly working in the src/ directory:
- App.js is where we will write our component code for the password generator.
- App.css can contain styling for our app.
- index.js is the JavaScript entry point that attaches our React app to the HTML. It’s usually minimal and you won’t need to change much there for this project.
Implementation Steps for Our Project
Now let's implement the features one by one. We will proceed with adding state, writing the generator function, rendering the inputs and outputs, and finally testing the app.
Step 1: Define State Variables
Open src/App.js. First, import the useState hook from React, since we will use it for state management:
import React, { useState } from 'react';Inside the App function, before the return statement, create state variables using useState for all the data we need to track:
function App() {
  // State variables for the password generator
  const [password, setPassword] = useState("");            // generated password
  const [passwordLength, setPasswordLength] = useState(12); // default length 12
  const [includeUppercase, setIncludeUppercase] = useState(true);
  const [includeLowercase, setIncludeLowercase] = useState(true);
  const [includeNumbers, setIncludeNumbers] = useState(true);
  const [includeSymbols, setIncludeSymbols] = useState(true);
  const [copySuccess, setCopySuccess] = useState("");      // message after copying
Explanation:
- We initialized password as an empty string (no password generated yet).
- passwordLength starts at 12, a common default length for strong passwords. The user can change it.
- The four booleans (includeUppercase, etc.) all start as true, meaning by default our generator will use all types of characters. The user can uncheck any if they want to exclude something.
- copySuccess will hold a success message string when the password is copied. It starts empty and will be set to a message like "Password copied!" for a short time after copying.
Step 2: Create the Password Generator Function
Still in App.js, below the state declarations, define a function generatePassword that uses the current state to build a random password:
// Function to generate a random password based on selected options
  const generatePassword = () => {
    let charset = "";
    if (includeUppercase) charset += "ABCDEFGHIJKLMNOPQRSTUVWXYZ";
    if (includeLowercase) charset += "abcdefghijklmnopqrstuvwxyz";
    if (includeNumbers)   charset += "0123456789";
    if (includeSymbols)   charset += "!@#$%^&*()";

    if (charset === "") {
      // No character set selected; we can alert or return early
      alert("Please select at least one character type.");
      return;
    }

    let newPassword = "";
    for (let i = 0; i < passwordLength; i++) {
      const randomIndex = Math.floor(Math.random() * charset.length);
      newPassword += charset.charAt(randomIndex);
    }
    setPassword(newPassword);
  };
Explanation:
We build charset by concatenating strings of characters for each selected category. If the user has unchecked something, that part won't be added. We ensure charset isn’t empty; if it is, we alert the user and exit the function (to avoid generating an empty password).
Then we use a for loop that runs passwordLength times. Each iteration, we use Math.random() and Math.floor() to pick a random index in the charset string, and append that character to newPassword.
After the loop, newPassword contains a random selection of characters of the desired length, and we update the state with setPassword(newPassword). React will then re-render the component, so the new password will show up in the UI.
Step 3: Create the Copy-to-Clipboard Function
Next, define a function to handle copying the generated password to the user’s clipboard. We'll use the Clipboard API for simplicity:
 // Function to copy the generated password to clipboard
  const copyToClipboard = () => {
    if (!password) return;  // nothing to copy if password is empty
    navigator.clipboard.writeText(password)
      .then(() => {
        setCopySuccess("Password copied to clipboard!");
        // Clear the success message after 2 seconds
        setTimeout(() => setCopySuccess(""), 2000);
      })
      .catch(err => {
        console.error("Could not copy password", err);
      });
  };
Explanation:
We first check if there's a password to copy (if password state is empty, we do nothing). Then we call navigator.clipboard.writeText(password). This returns a Promise; on success, we update copySuccess message to inform the user.
We also use setTimeout to reset that message after 2 seconds (so the "copied" notification disappears automatically). If the copy fails for some reason (perhaps due to browser permissions), we log an error – in a real app, you might show an error to user, but that's an edge case.
Step 4: Build the User Interface (JSX Markup)
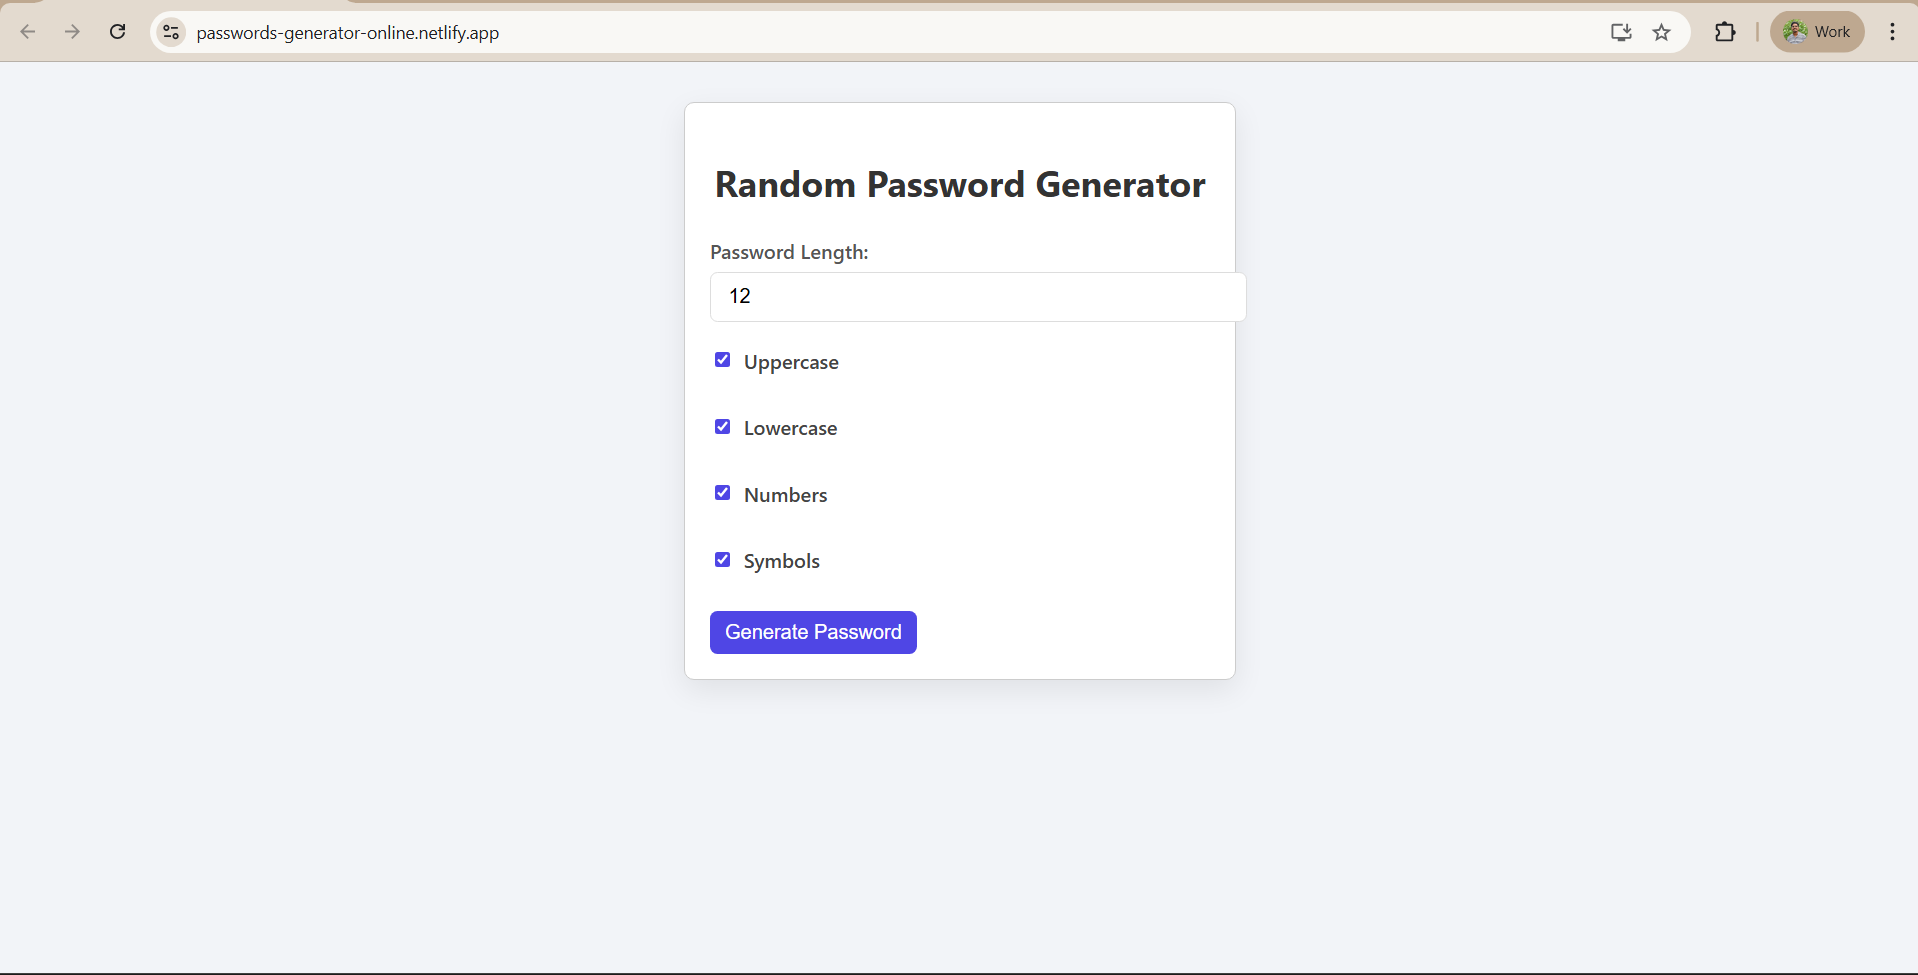
Now we will create the JSX to render the input fields, checkboxes, buttons, and output. Replace the return statement of the App component with the following JSX structure:
  return (
    <div className="App" style={{ maxWidth: "400px", margin: "2rem auto", padding: "20px", border: "1px solid #ccc", borderRadius: "8px" }}>
      <h2 style={{ textAlign: "center" }}>Random Password Generator</h2>

      {/* Input for password length */}
      <div className="input-group">
        <label>Password Length: </label>
        <input
          type="number"
          min="8" max="32"
          value={passwordLength}
          onChange={(e) => setPasswordLength(parseInt(e.target.value) || 0)}
        />
      </div>

      {/* Checkbox options */}
      <div className="options">
        <label>
          <input
            type="checkbox"
            checked={includeUppercase}
            onChange={() => setIncludeUppercase(!includeUppercase)}
          /> Uppercase
        </label><br/>
        <label>
          <input
            type="checkbox"
            checked={includeLowercase}
            onChange={() => setIncludeLowercase(!includeLowercase)}
          /> Lowercase
        </label><br/>
        <label>
          <input
            type="checkbox"
            checked={includeNumbers}
            onChange={() => setIncludeNumbers(!includeNumbers)}
          /> Numbers
        </label><br/>
        <label>
          <input
            type="checkbox"
            checked={includeSymbols}
            onChange={() => setIncludeSymbols(!includeSymbols)}
          /> Symbols
        </label>
      </div>

      {/* Generate button */}
      <button onClick={generatePassword} style={{ marginTop: "10px", padding: "8px 12px" }}>
        Generate Password
      </button>

      {/* Display generated password and copy button */}
      {password && (
        <div className="output" style={{ marginTop: "15px" }}>
          <p><b>Generated Password:</b></p>
          <input type="text" readOnly value={password} style={{ width: "100%" }} />
          <button onClick={copyToClipboard} style={{ marginTop: "5px" }}>Copy to Clipboard</button>
        </div>
      )}

      {/* Success message */}
      {copySuccess && (
        <p style={{ color: "green", marginTop: "5px" }}>{copySuccess}</p>
      )}
    </div>
  );
With this UI in place, the React component ties together state, events, and logic. As the user interacts:
- Changing the number or checkboxes updates state immediately (thanks to onChange handlers). We could generate a new password on each change automatically, but here we wait for the button click.
- Clicking "Generate Password" calls the function which sets a new password state, causing the password display and copy button to appear with the new value.
- Clicking "Copy to Clipboard" triggers the copy logic and success message.
Step 5: Testing the Application
Now that we have implemented the component, test it locally:
- Save your changes in App.js (and any CSS changes in App.css if you did styling separately).
- Ensure your development server is still running (npm start). The browser should refresh and show your new UI instead of the React logo.
- Try it out: select a length, toggle some options, and click "Generate Password". A password string should appear. Each click should produce a different password (likely a mix of letters, numbers, symbols depending on what’s checked).
- Click "Copy to Clipboard". You should see the success message appear. You can try pasting (Ctrl+V) somewhere to verify the password was copied correctly.
- Test edge cases: if you deselect all checkboxes and click generate, our code currently alerts the user to select at least one type. If you set an extremely large length (above our max or a non-number), our input constraints should prevent it or the parseInt will result in 0 which would generate nothing.
If something isn’t working, check the console for errors or typos. Common issues might be not importing React or useState properly, or misnaming a state variable. But if all went well, you now have a functioning Random Password Generator running on localhost 🎉.
Code Summary: For reference, here’s the final App.js code assembled in one place:
// App.js
import React, { useState } from 'react';
import './App.css';

function App() {
  const [password, setPassword] = useState("");
  const [passwordLength, setPasswordLength] = useState(12);
  const [includeUppercase, setIncludeUppercase] = useState(true);
  const [includeLowercase, setIncludeLowercase] = useState(true);
  const [includeNumbers, setIncludeNumbers] = useState(true);
  const [includeSymbols, setIncludeSymbols] = useState(true);
  const [copySuccess, setCopySuccess] = useState("");

  const generatePassword = () => {
    let charset = "";
    if (includeUppercase) charset += "ABCDEFGHIJKLMNOPQRSTUVWXYZ";
    if (includeLowercase) charset += "abcdefghijklmnopqrstuvwxyz";
    if (includeNumbers)   charset += "0123456789";
    if (includeSymbols)   charset += "!@#$%^&*()";

    if (!charset) {
      alert("Please select at least one character type.");
      return;
    }

    let newPassword = "";
    for (let i = 0; i < passwordLength; i++) {
      const randomIndex = Math.floor(Math.random() * charset.length);
      newPassword += charset.charAt(randomIndex);
    }
    setPassword(newPassword);
  };

  const copyToClipboard = () => {
    if (!password) return;
    navigator.clipboard.writeText(password).then(() => {
      setCopySuccess("Password copied to clipboard!");
      setTimeout(() => setCopySuccess(""), 2000);
    });
  };

  return (
    <div className="App" style={{ maxWidth: "400px", margin: "2rem auto", padding: "20px", border: "1px solid #ccc", borderRadius: "8px" }}>
      <h2 style={{ textAlign: "center" }}>Random Password Generator</h2>

      <div className="input-group">
        <label>Password Length: </label>
        <input
          type="number"
          min="8" max="32"
          value={passwordLength}
          onChange={(e) => setPasswordLength(parseInt(e.target.value) || 0)}
        />
      </div>

      <div className="options">
        <label>
          <input type="checkbox" checked={includeUppercase} onChange={() => setIncludeUppercase(!includeUppercase)} />
          Uppercase
        </label><br/>
        <label>
          <input type="checkbox" checked={includeLowercase} onChange={() => setIncludeLowercase(!includeLowercase)} />
          Lowercase
        </label><br/>
        <label>
          <input type="checkbox" checked={includeNumbers} onChange={() => setIncludeNumbers(!includeNumbers)} />
          Numbers
        </label><br/>
        <label>
          <input type="checkbox" checked={includeSymbols} onChange={() => setIncludeSymbols(!includeSymbols)} />
          Symbols
        </label>
      </div>

      <button onClick={generatePassword} style={{ marginTop: "10px", padding: "8px 12px" }}>
        Generate Password
      </button>

      {password && (
        <div className="output" style={{ marginTop: "15px" }}>
          <p><b>Generated Password:</b></p>
          <input type="text" readOnly value={password} style={{ width: "100%" }} />
          <button onClick={copyToClipboard} style={{ marginTop: "5px" }}>Copy to Clipboard</button>
        </div>
      )}

      {copySuccess && <p style={{ color: "green", marginTop: "5px" }}>{copySuccess}</p>}
    </div>
  );
}

export default App;
Additionally, our src/index.js (if you open it) should look like this (this is the default generated code, which usually doesn’t need changes for our project):
import React from 'react';
import ReactDOM from 'react-dom/client';
import './index.css';
import App from './App';

const root = ReactDOM.createRoot(document.getElementById('root'));
root.render(<App />);
This just renders the App component into the <div id="root"> in the HTML. No modifications needed here except ensuring it’s using ReactDOM.createRoot (the new API in React 18+) as shown.


